原文:https://www.arduino.cc/reference/en/language/functions/digital-io/digitalread/
説明
HIGH または LOW のいずれかが指定されたデジタルピンから値を読み取ります。(Reads the value from a specified digital pin, either HIGH or LOW.)
シンタックス
digitalRead(pin)パラメータ
pin: 値を読みたいArduinoのピン番号(the Arduino pin number you want to read)
戻り値
HIGH または LOW
サンプルコード
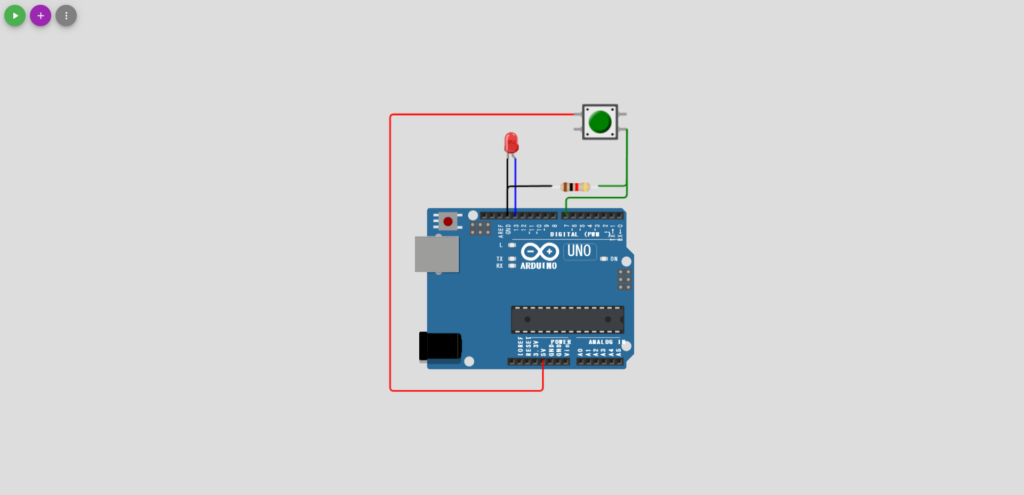
13番ピンを7番ピンと同じ値に設定し、入力として宣言します。(Sets pin 13 to the same value as pin 7, declared as an input.)
int ledPin = 13;  // 13番ピンにLEDを接続する(LED connected to digital pin 13)
int inPin = 7;    // 7番ピンに押しボタンを接続する(pushbutton connected to digital pin 7)
int val = 0;      // 読んだ値を記憶する変数(variable to store the read value)

void setup() {
  pinMode(ledPin, OUTPUT);  // デジタル13番ピンを出力として設定する(sets the digital pin 13 as output)
  pinMode(inPin, INPUT);    // デジタル7番ピンを入力として設定する(sets the digital pin 7 as input)
}

void loop() {
  val = digitalRead(inPin);   // 入力ピンの値を読む(read the input pin)
  digitalWrite(ledPin, val);  // LEDにボタンの値を設定する(sets the LED to the button's value)
}
注意事項
ピンに何も接続されていない場合、digitalRead() は HIGH または LOW を取り得ます。 (これはランダムに変化する可能性があります)。(If the pin isn’t connected to anything, digitalRead() can return either HIGH or LOW (and this can change randomly).)
アナログ入力ピンは、A0、A1 などと呼ばれるデジタルピンとして使用できます。例外は、Arduino Nano、Pro Mini、および Mini の A6 および A7 ピンで、アナログ入力としてのみ使用できます。(The analog input pins can be used as digital pins, referred to as A0, A1, etc. The exception is the Arduino Nano, Pro Mini, and Mini’s A6 and A7 pins, which can only be used as analog inputs.)
補足情報:wokwiによるシミュレーション
wokwiによるシミュレーションは下記の通りです。画面右側の「Simulation」タブの再生ボタン(▶)を押すとシミュレーションが開始されます。
動きの説明:ボタンを押すと赤色LEDが光ります。
回路の説明:ボタンの誤作動防止のためにプルダウン抵抗を追加しています。
https://wokwi.com/projects/345851324145861203

補足情報:GitHubリポジトリ
下記にソースコードを保存しています。
